Showing posts with label Recipes. Show all posts

Friday, June 26, 2026

Toasted Marshmallow Old Fashioned Inspired by 50's Primetime Cafe in Disney World’s Hollywood Studios

 *This post contains affiliate links.  As an Amazon Associate I earn from qualifying purchases.

When we were at Disney World this past spring break, Brian and I tried the best cocktail we’ve ever had in our entire lives, and it lives in 50’s Primetime Café inside Hollywood Studios at Disney World.

If you are a fan of whiskey, then this Toasted Marshmallow Old Fashioned is a must try.  It is so unique, so delicious, and it's equal parts traditional and sweet, making it the perfect cocktail to serve any time – at happy hour, at dinner, with dessert (or AS dessert, haha), or as a nightcap. 

Brian was able to find a couple of threads online that suggested which ingredients it included, he purchased them, and I can officially say that he has perfected the recipe.  We cannot get enough, and we have made these so many times that I can’t even count. 

We purchased fancy ice molds, garnish picks, and a kitchen torch to elevate our drinks, and we can now make the most perfect cocktail right at home for a fraction of the cost at a bar. 


Use It

Whiskey glasses (I’m obsessed with a good icon glass!)

Ice molds (we love these, but they come in loads of different shapes)

Kitchen torch (you could use matches or a lighter if you don’t have a torch)

Garnish picks (we love these)


Buy It

3 oz. Bourbon Whiskey (Woodford Reserve is the absolute best for this drink but you could use what you have on hand… it won’t taste quite as good, though.  And Woodford Reserve is the brand that Disney uses.)

1/2 oz. Torani Toasted Marshmallow Syrup

2 shakes Hella Cocktail Co. Smoked Chili Bitters (these are the exact bitters that Disney lists for this drink on their menu)

2 Marshmallows (Standard size, not mini)


Make It

1.    Add ice to a whiskey glass.

2.    Combine whiskey, toasted marshmallow syrup, and chili bitters over ice.

3.    Stir well.

4.    Roast marshmallows with kitchen torch and use as garnish.


This recipe makes one cocktail, but you may want to keep enough ingredients on hand for a second round, because I promise you are going to want another.  They are that good!  And on a weird note, both Brian and I agree that these taste like the Pirates of the Caribbean Ride in Magic Kingdom smells.  Haha.  They pipe in those unique scents that smell so good and this is the equivalent in drink form.  ;o)

Cheers!


Wednesday, February 11, 2026

Taylor Swift Eras Tour Friendship Bracelet Donuts

 *This post contains affiliate links.  As an Amazon Associate I earn from qualifying purchases.

If you’re looking for the perfect Taylor Swift treat for Valentine’s Day, a birthday party, or any other kind of gathering, we have you covered today!

It’s no secret that we’re huge Swifties in our house, so when Olivia was invited to a Taylor Swift Eras Tour documentary viewing party back in December, she couldn’t say yes fast enough.  Each girl was asked to bring a Taylor Swift themed snack, so I bought all the supplies to make these Taylor Swift Eras Tour friendship bracelet donuts, and they were a huge hit!  They’re so easy that Olivia was able to make them all by herself, and she actually enjoyed making them because they were so crafty!


To make these, you’ll need the following:

12 glazed donuts (one for each album)

1 tube of white frosting

Smarties

Food safe marker

Candy beads in all different colors

Mini mirror balls (not edible)


To make the letter beads, Olivia pulled out all the white Smarties from the packs (although, you could use all the colors if you wanted to!) and then she used the food safe pen to write each of the album names on them, letter by letter.  She then put a ring of frosting around the top of each donut so the candy beads would stick, and then she placed all the letter beads followed by the other candy beads to make them look like friendship bracelets. 


Each Taylor Swift album is associated with a specific color, so Olivia decorated them accordingly, while also adding some of her own flair to each one.  The traditional colors for each of the albums are as follows:

Taylor Swift (Debut) – green

Fearless – yellow / gold

Speak Now – purple

Red – red

1989 – light blue

Reputation – black

Lover – pink

Folklore – grey

Evermore – brown (we didn’t have brown candy beads, so Olivia used grey and white)

Midnights – dark blue

The Tortured Poets Department – white (she also used grey and black)

The Life of a Showgirl – orange / mint green


Then once all the donuts were decorated, she popped mini mirrorballs (that are not edible) in the middle of each donut so the girls could have a little gift to take home with them. 

The girls got to enjoy festive and yummy treats and now each of them have matching mirrorballs that they can hang somewhere in their rooms or on their Christmas tree year after year. 

And the best part is that these were very inexpensive to make!

If you’re not a Taylor Swift fan, you could make any version of these that you wanted…

Friendship

Love (like Conversation Hearts!)

Other bands or musicians

Song lyrics

Sports teams

Bible verses

Christmas

Halloween 

Easter

Summertime

July 4th

New Year's Eve


The possibilities are endless! 

I’d hoped to have this post up shortly after the release of the Eras Tour documentary, but since I missed the window, I figured Valentine’s Day was perfect, too!  ;o)

Happy Wednesday, y’all!


Monday, November 25, 2024

Candy Cane Christmas Cookies

*This post contains affiliate links.  As an Amazon Associate I earn from qualifying purchases.

I shared Brian’s grandmother’s chocolate chip cookie recipe on the blog back in 2017, and today I’m sharing those same cookies with a twist that’s perfect for the holidays… candy cane! 

Before I talk about the new recipe, let’s revisit the original recipe… these chocolate chip cookies are the epitome of the perfect cookie.  They are gooey on the inside and chewy around the edges and they are, by far, my favorite chocolate chip cookies of all-time, homemade or store-bought.

Last Christmas, Brian decided to add a little twist to the OG cookie recipe to make something special for Christmas Eve, and y’all, just when I thought the original cookies couldn’t get any better, they did. 

These are spectacular!  They were so good that I literally grabbed a plateful to photograph last Christmas Eve right after Brian made them because I knew I’d want to post them on the blog this year.  So, the pictures you’re seeing today were actually taken last Christmas Eve!  We plan to have them again this year, and I can’t wait! 

Enough rambling… let’s get to the recipe!   


Use It

Large mixing bowl

Small mixing bowl

Chopper (Brian used this to chop the Hershey Kisses quickly and easily)

Cookie sheet

Cookie dough scoop


Buy It

2 1/4 cups sifted flour

1 tsp. baking soda

1/2 tsp. salt

1 cup shortening (we use Crisco)

1/2 cup white sugar

1 cup light brown sugar

2 eggs beaten

1/2 tsp. vanilla

30 Candy Cane Hershey Kisses, chopped (one bag is more than enough)


Make It

1.    Combine flour, baking soda and salt and set aside.


2.    In a separate large bowl, combine shortening, white sugar, and brown sugar.


3.    Add eggs and vanilla to shortening and sugar mixture.


4.    Add flour mixture to shortening and sugar mixture.


5.    Stir in chopped Candy Cane Hershey Kisses.


6.    Drop dough in small balls onto a greased cookie sheet.  (We love this scoop.  It makes cookie baking so much easier.)


7.    Bake at 350 for 10-12 minutes.


8.    Let cool.


Makes around 30 cookies.


The peppermint to cookie ratio is perfect… the mint isn’t overpowering at all, so you get the best of both worlds – the mint and the flavor of the actual cookie. 

These cookies are an absolute delight, and I hope you enjoy them!  Be sure to tag me on Instagram if you make them!

Happy Wednesday, y’all!


Tuesday, September 10, 2024

Five Quick and Easy Meals for Busy Nights

*This post contains affiliate links.  As an Amazon Associate I earn from qualifying purchases.

During the school year, there’s little time to cook since I’m running the kids to all of their after-school activities, so most nights, I cook meals that are quick, that don’t dirty a lot of pots and pans (who has the time to clean up a massively filthy kitchen?), and that are fairly nutritious. 

Today, I’m sharing five of my favorites of all-time.  These are in our regular rotation always, and they’re all easy and delicious. 

One Pan Sausage and Vegetables

This dish is healthy, it only requires one pan (easy cleanup!), and if you use a chopper like this one, prep time is only 10-15 minutes.  The best part is that you can customize it to your family’s liking by omitting and/or adding different veggies to try a different combination every time.  And you don’t have to deal with any raw meat!  You can see the whole recipe here.


One Pan Beef and Parmesan Pasta

This meal is another one that only uses one pan, making cleanup a breeze, and the entire meal is ready from start to finish in less than 30 minutes.  It’s SO satisfying and delicious, too.  I’ve been making it for probably 15 years!  See the recipe here.


One Pan Chicken, Red Potatoes, and Broccoli

While this meal does have to bake for an hour, the prep time is minimal (about 15 minutes), and again, it only requires one pan!  Therefore, you can pop it in the oven, tackle some tasks while you wait for the oven to do all of the work, and then just pull it out and serve.  See the recipe here.


Chicken and Pineapple Stir Fry

This stir fry recipe is delicious, it packs a lot of protein and veggies, and again, you can customize this one by omitting and/or adding any veggies of your choice.  This recipe is ready from start to finish in just about 30 minutes.  You can see the recipe here.


Easy Mini Pizzas Using Biscuit Dough

And finally, if you’re looking for a real crowd-pleaser, these mini pizzas made on biscuit dough instead of crust are DE-LISH.  You can add whatever toppings you like, and these are ready in less than 30 minutes from start to finish.  They also only dirty one sheet pan.  See the recipe here.


All of these are well-loved, most of them are healthy, and they’re all quick and easy for your busiest weeknight.

Happy Tuesday, y’all!


Wednesday, August 28, 2024

Quick and Easy Protein-Packed Microwave Egg Bowls

*This post contains affiliate links.  As an Amazon Associate I earn from qualifying purchases.

One of my goals for 2024 was to add more protein to my diet, and I recently found a very quick and easy way to do that.  These microwave egg bowls take all of five minutes to make, they’re super easy, the ingredients are easy to keep on hand, cleanup is easy, and they pack a whopping 26.5 grams of protein per bowl.  Oh, and they allow you to get some greens, too. 

The best part is that they’re great for breakfast, lunch, dinner, or even a midday snack!


Use It

Bowl (just a standard cereal or soup bowl)


Buy It

2 Eggs (I use extra-large)

1/4 cup cottage cheese (I use the low-fat Daisy cottage cheese)

Handful of baby kale, shredded (or you could add spinach, too!)

1/4 cup shredded cheddar cheese (I like Kraft extra sharp)

Sprinkle of salt (I use Himalayan pink sea salt)


Make It

1.    Crack both eggs directly into your bowl and whisk until smooth.

2.    Add cottage cheese and whisk together.

3.    Toss in baby kale and salt and stir until combined.

4.    Pop in the microwave on high for 1-minute.  Remove and stir.  Put back in the microwave for 1 more minute and stir.  If not totally cooked through, add 30 additional seconds until eggs are fully cooked.

5.    Top with shredded cheddar cheese and enjoy.


The cottage cheese will take your eggs to a whole new level – it makes them SO fluffy and delicious – and even if you don’t like cottage cheese, you can totally eat this because you don’t taste the cottage cheese at all!  I’m telling you, you will never want to eat eggs without it again!

That cottage cheese is also the key ingredient for that extra protein! 

This entire meal takes about two minutes of prep time and then 2-2.5 minutes of cooking time so it’s a great way to get a healthy meal in a hurry, and it’s PACKED with protein.  Here’s the breakdown:

2 extra-large eggs = 14 grams

1/4 cup cottage cheese = 6.5 grams

1/4 cup shredded cheddar = 6 grams

And if you’re looking to add even more protein to your bowl, you can add two tablespoons of Vital Proteins Collagen Peptides for an additional 18 grams bringing your bowl to a whopping 44.5 grams!  Vital Proteins Collagen Peptides is awesome because it adds not only protein, but also 20 grams of collagen which is essential for healthy hair, skin, and nails.  They are flavorless and add zero texture or taste to your bowl!

I started taking it a couple of weeks ago and I can’t wait to report back and let y’all know what I think!

I usually pair my egg bowl with an apple or some blueberries and that keeps me full all morning or afternoon.

Happy eating!


Thursday, February 9, 2023

Valentine’s Day Fruit Board

*This post contains affiliate links.  As an Amazon Associate I earn from qualifying purchases.

I made this sweet little fruit board for my Galentine’s Day brunch last weekend, and it was a hit… and it was soooo easy to put together!


Use It

Board or serving tray (this heart-shaped board is cute, too!)

Ramekins

Heart-shaped cookie cutters


Buy It

Strawberries

Watermelon

Blackberries

Vanilla yogurt (or chocolate, etc.)

Chocolate covered pretzel hearts (or any other festive candy)


Make It

1.    Cut watermelon into slices and then punch out hearts with your cookie cutter.

2.    Arrange ramekins on the tray.

3.    Arrange fruit around the ramekins.

4.    Fill ramekins with yogurt and treats.


Simple, yet adorable!  This would be perfect for any breakfast, brunch, party, or get-together.  It would even be cute for a class party!

Happy (almost) Valentine’s Day, y’all!


*Linking up with Slices of Life for Encouraging Hearts and Home: Crafty Inspiration


Thursday, October 27, 2022

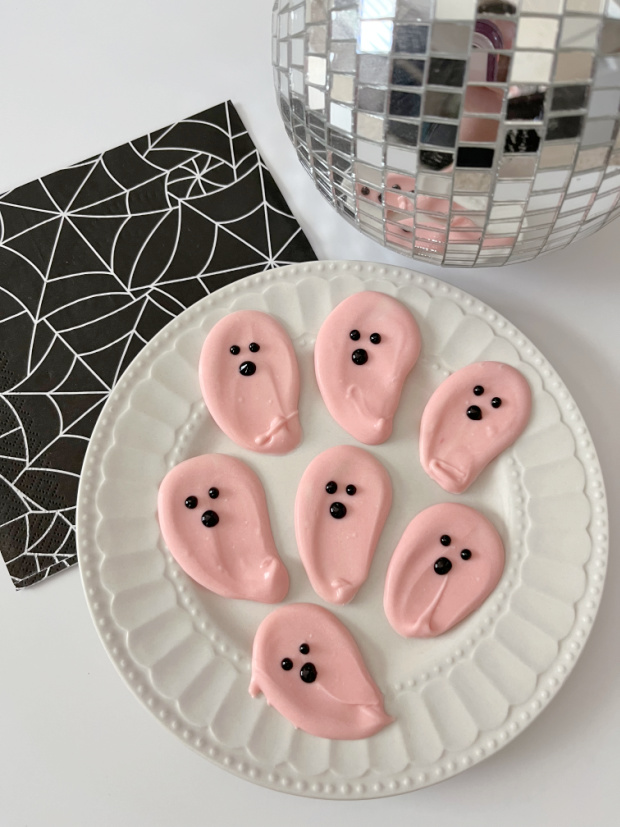
Easy Chocolate Ghost Cupcake Toppers

*This post contains affiliate links.  As an Amazon Associate I earn from qualifying purchases.

I’ve been seeing these adorable ghosts all over social media, and I wanted to try my hand at them.  It turns out that they’re super easy to make, and they’re tasty, too.  You could make a batch of these little guys and put them on any treat to make them instantly festive for Halloween.  I decided to add mine to some cupcakes, and they make the absolute cutest little cupcake toppers! 

The best part about the recipe is that you can make the ghosts any color you want!  All you need is a little bit of food coloring.


Use It

Parchment Paper (we use this brand)

Cheese Spreader (these are great!)


Buy It

White Melting Chocolates (I used these)

Food Coloring (whatever color you want the ghosts to be... I used these)

Black Writing Gel or Frosting (I used this)


Make It

1.    Add melting chocolates to a bowl.  I used about 1/4 cup, and it made seven ghosts.

2.    Heat melting chocolates in the microwave for 30 seconds.  Stir.  Add back to the microwave until chocolates are completely melted.  Remove and stir again. 

3.    Add one drop of food coloring to your melted chocolate and stir.  To make pink, I used one single drop of red food coloring, but you can add additional drops of color until the desired color is reached.  Trust me, though, a little bit of food coloring goes a LONG way.

4.    Spoon melted chocolate onto parchment paper.

5.    Using the cheese spreader, smear the chocolate down into a ghost shape.

6.    Repeat steps four and five for however many ghosts as you need.

7.    Wait for chocolate to harden.  It only took about 15 minutes to harden while sitting on my countertop, but you could put them in the refrigerator to cool and harden them faster.

8.    Using writing gel or writing frosting, draw faces on each of the ghosts.


You can then peel the ghosts right off of the parchment paper.  They come off so easily, and once hardened, they’re sturdy enough to use for all kinds of things… like my cute little cupcake toppers!  They would also be cute on brownies, on a cake, on a dessert or charcuterie board, or even on a plate all by themselves!  The possibilities are endless!

If you make these, I would love to see them!  Be sure to tag me @lindsayssweetworld on Instagram!